Order Guide Tab

Contents
You don't have to spend hours going through a printed Buyer's Stock Status report anymore. Now you have an interactive customizable reporting tool in the new entrée V4 SQL Vendor Order Guide feature.
You also can choose to use Quantity Ordered to calculate your ordering instead of the Quantity Shipped which is your only option with the paper report.
It will help you save time and get your purchasing done quicker and more efficiently with information already in the entrée system!
The new Order Guide Tab is part of the redesign of the entrée Purchasing system. The features of the Order Guides Tab will reduce your reliance on the Buyer's Stock Status Report to do your purchasing.
New Features in version 4.1
•Cubes: The Cubes field has been added to the screen and represents the total cubes for the item. When you edit the Order Quantity the Cubes value will be recalculated for the item.

•Unit Cost: The Unit Cost is now editable. When building a Purchase Order the costs entered will be passed to Create PO for the items.
•Last Order Information section: Updated the Item Information grid and vendor items to include the Last Vendor, Last Quantity, Last Cost, and Last Date. |
|

•Unit Price: Updated the Customer Sales Details sub-grid, accessed when expanding the item information in the grid using the plus sign, to contain the Unit Price to the customer.

•Allocations and True On Hand: These columns can optionally be displayed for the item using the * grid configuration tool.
•Warehouse Location: This filter is only available if entrée.MW Mod #737 is installed.
When Mod #737 entrée.MW is installed a new drop down menu filter is activated to list each of the warehouses by warehouse name. When an individual warehouse is selected, Sales transactions will be filtered by sales originating from the selected warehouse. If the warehouse does not contain the items the values will be zeros.

It is as easy as 1 - 2 - 3!
The Order Guide Tab has 4 main areas, the Filter Options Area, Item Grid Area, Item Information Area and the Estimated Totals Area. The features in these areas will be discussed in this chapter.
1. Find the desired Vendor and click the Order Guide Tab.
2. Select your Filter Options and click the Calculate button. The Item Grid will be populated with the items you purchase from that Vendor. Items with the Order Quantity in green text need to be ordered.
3. You can select an Item in the Item Grid to see the Item Detail Information Area on the right including the item image, On Hand Quantity, Order Point, On Order Quantity, Reorder Quantity and all the other information you need about the status of the item can be found in the Item Grid and Item Detail Information Area.
4. Make any changes to your filtering and you must click the Calculate button again.
5. entrée will generate the cases, pallets, weight and cost in the Estimated Totals area for the selected item in the grid.
If the Vendor’s minimum order parameters have been defined in the PO Options tab on the Vendor Tab that field value will be displayed with GREEN text when the requirements have been met as seen here. If the minimum order requirements have not been met, and in red if it falls short.
Inactive Items
The “Display Inactive Items” option has been added above the item grid. To see the inactive status for each item you must add the “Inactive” column to the grid configuration. This feature allows users to identify inactive items for a vendor quickly before ordering.

Filter Options Overview
Only Display Required Items
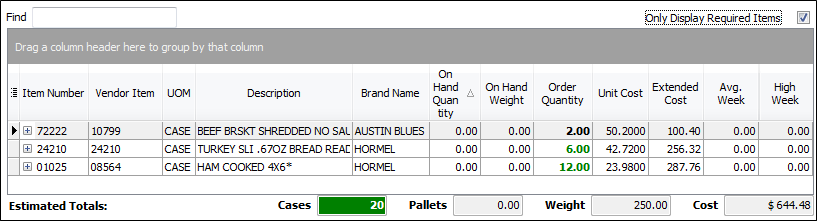
Check this option above the Item Grid on the right side if you would like the entrée system to evaluate the vendor's items and only display what needs to be ordered.
Show / Hide Filter Options Button
Use this button (outlined in red below) to hide the control panel filters area and expand the item grid area to view more columns on the screen.
Save Defaults Button Once you find the optimal default filter values for the vendor use this button to save the Vendor defaults to your entrée user profile.
The Default Options are saved on a per user account basis.
In the Security Manager Miscellaneous options #111 Allow editing in Vendor File Maintenance must be checked for the user account to edit and save the defaults for this feature.
Once saved Vendor Maintenance will load the vendor's default ordering parameters, Filters and item grid configurations from the user's profile.
Calculate Button Used to run / update the evaluation output and refresh the items in the grid using the filter options. |
|

Filter Options
•The filtering options will change depending on what is selected in the Calculate Using drop down menu.
•The filter options shown here are the defaults for the feature.
•Update the filter options as required to reflect how your business runs and generate estimated order quantities.
Run for Primary items only
Only run for the items that have the current vendor assigned as the primary vendor in the Inventory File Vendor Tab.
Combine Case and PC. items
Checked by default. If this option is checked only the case items will be listed in the grid and the case and piece items will be combined.
 In the Item Grid below the Combine Case and PC. items option was not checked so the PC. items are listed in the grid individually.

Calculate Using Use the drop down menu to make a selection.
▪Past Sales (default) ▪Order Point ▪Selected Invoices |
|

Evaluation Weeks
The default is twelve weeks. Use the Up / Down arrows to set the number of weeks you want evaluated to determine the estimated totals. There will always be at least 12 weeks worth of sales data in the system.
Ending Date
The default is the current date. Use the drop down arrow to open the calendar feature and set your ending date for the evaluation period.
Weekly Usage ▪Average Sales - Calculate the usage using the average weekly sales over the specified number of weeks to review. ▪Highest Sales - Uses the highest weekly quantity over the specified number of weeks to review. |
|

Calculation Qty. ▪Quantity Shipped ▪Quantity Ordered |
|
Rounding ▪None ▪Full Pallet ▪Pallet Layer ▪Up to 5 - Round up to nearest 5. ▪Down to 5 - Round down to nearest 5. |
|


Full Pallet - This method looks at the Pallet Quantity for the item which is defined using the Pallet Info dialog in the Vendor Tab of the Inventory File or the Items tab of the Vendor File. If Full Pallet is defined in the Inventory File it is for all vendors selling that item.
In the Vendor File the Override Ordering option, discussed in the Past Sales topic, will allow for a per vendor override to be defined for that specific vendor.
▪If the Pallet Quantity is ZERO no rounding will be performed and the system will return whatever value was calculated.
▪If the Pallet Quantity is greater than Zero we use a 0.25 threshold for rounding. If it is less than a quarter pallet we round down and greater than a quarter pallet we round up. If the required quantity for the item is less than a quarter pallet, a single pallet will be ordered, even though it is less than quarter pallet threshold.
▪The suggested order quantity will be the pallet quantity * the number of pallets the system calculated to be ordered.
Pallet Layer - This method look at the Pallet Layer quantity for the item which is defined using the Pallet Info dialog in the Vendor Tab of the Inventory File or the Items tab of the Vendor File. If Pallet Layer is defined in the Inventory File it is for all vendors selling that item.
In the Vendor File the Override Ordering option, discussed in the Past Sales topic, will allow for a per vendor override to be defined for that specific vendor.
▪If the Pallet Layer Quantity is ZERO no rounding will be performed and the system will return whatever value was calculated.
▪If the Pallet Layer Quantity is greater than zero, the required quantity for the item is divided into the pallet layer quantity to determine the number of layers to order. If there is any remainder the number of layers to be ordered will be rounded up.
▪The suggested order quantity will be the pallet layer quantity * the number of pallets layers the system calculated to be ordered.
Up to 5 - This method will take the calculated required for the item and round up to the next 5. No rounding is performed if the required quantity is already evenly divisible by 5.
Down to 5 - This method will take the calculated required for the item and round down to the next 5. No rounding is performed if the required quantity is already evenly divisible by 5.
 Pallet Rounding Rule - If the amount to order is greater than* a quarter of a pallet, the pallet quantity will get increased by one (1).
Minimum Weeks
▪Formerly called APO Weeks, this field is used to determine if the item should be ordered when automatically generating purchase orders using the Auto PO feature.
▪Enter the number of weeks worth of product to keep on hand at all times in this field. The value for the number of weeks can be determined by dividing the number of days by 7.
▪The supply time or the amount of time that it takes to receive product after the order has been placed should also be factored in when entering the Minimum Weeks.
If a 10-day supply of product should be kept on hand at all times and it takes about 10 days for an order to reach the warehouse, the value entered in the Minimum Weeks field would be 2.86 using this formula: 20 days / 7 days in a week = 2.86.
Order Weeks
▪Formerly called Purchase Multiple, this field is used to determine how much product should be ordered when automatically generating purchase orders using the Auto PO feature.
▪If the item should never be ordered automatically, leave the value of the purchase multiple set to 0.
▪Enter the number of weeks worth of product that should be ordered in this field. The value for the number of weeks can be determined by dividing the number of days by 7.
To keep a two week supply of the item use this formula: 14 days / 7 days in a week = 2.0.
If your needs were instead for a ten day supply the formula: 10 days / 7 days in a week = 1.4.
Calculate Using
Your calculate using filtering options will change depending on the option selected from the drop down menu. There are three possible choices: Past Sales, Order Point or Selected Invoices. Descriptions of each calculate using option follows.
Past Sales This calculation method is based on how many units of the product are used per week. This value, called derived weekly usage, is compared to current inventory levels to determine how long your supply will last.
If the supply time falls below the threshold set in the Minimum Weeks value this feature will suggest an order quantity using the formula:
Derived Wkly Usage * Order Weeks = Order Qty
Deduct On Hand & On Order When this option is enabled the system will deduct the “On Hand” and “On Order” quantities from the “Order Quantity” value. If the deduction of these values produces an “Order Quantity” amount that is less than zero then the value will be set to zero. |
|

How Calculations Using Past Sales Works
1. All sales for the vendor's item are reviewed using the number of Evaluation Weeks value and Calculation
Qty choice either Quantity Shipped or Quantity Ordered.
2. Your choice for Weekly Usage, either Average Sales or Highest Sales (for a single week) determines what number is used to find your Derived Wkly Usage for the item.
3. Next the system uses this formula to find Total Available Inventory for the item:
On Hand Qty + On Order Qty = Total Available Inventory
4. Next the system will test to see if Total Available Inventory is less than Derived Wkly Usage * Minimum Weeks.
5. If Total Available Inventory is less then another calculation is performed to find a value for suggested order quantity.
Order Weeks * Derived Wkly Usage = Suggested Order Qty
6. Your selection for Rounding will modify the final Estimated Totals values displayed.
How to Modify Minimum Weeks & Order Weeks for Past Sales Calculations
1.For Past Sales filter options only there is a way you can modify the Minimum Weeks and Order Weeks values for an item selected in the grid.
2.Go to the Items tab and in the item grid is a column labeled Override Ordering. When you check this option you can specify the Minimum Weeks and Order Weeks for the item Auto P.O. Parameters in the item detail panel of the Items tab.
3.Then perform your calculation again on the Order Guide Tab to see the updated values for the item.
Order Point Similar to the method used by Batch Mode in the Purchasing system, the Order Point value from the Inventory File is used for ordering calculations.
This is the formula: If On Hand Qty + On Order Qty is less than Order Point then the Re-Order Qty set in the Inventory File will be ordered.
Your selection for Rounding will modify the final Estimated Totals values displayed. |
|

How to Override the Order Point Calculation
In the Inventory File Vendor Tab for the item you can create up to four Special Reorder Definitions for specific dates ranges.
In the calculation here the Ending Date is compared to settings in the item's Special Reorder Definitions and if it finds a match it will override the Order Guide Tab values. The system replaces the Order Point and Reorder Quantity values here with the values from the Inventory File Vendor tab.
There is more information about Special Reorder Definitions later in this chapter.
Selected Invoices This option is based on the "Just in Time" ordering methodology.
You enter invoices all day and they use this method to determine what you need to buy to fulfill the invoices for a specific Date or date range using Start / Ending Dates.
Chose the Calculation Qty to use either Quantity Ordered or Quantity Shipped.
Then the system reviews the invoices and order the total required quantity. With this method you do not have to use Rounding, but it is available as an option. |
|

Item Grid Overview
Find Enter a value into the Find text box and it will search the Item Number, Vendor Item Number, and Description columns for a match.
Drag column header here to group by that column Use this tool to group and organize your view in the item grid. |
|

Click the icon to open a list of the available columns for the item grid.
•Check the columns you want display.
•Remove the check from columns so they do not display.
Sort Button Use the Up /Down arrow in the column header to sort the items by that column in ascending or descending order.
The “On Order Quantity” and “Supply Time” as columns have been added to the grid. |
|


Here the Combine Case and PC. items option was checked so no PC. items are seen.
Plus/Minus Buttons
Use these buttons to expand or collapse the Item in the grid to view Invoices associated with the item.
Minimum Order Displays
If the vendor minimum order parameters have been defined, the Order Quantity value will be displayed in GREEN if the minimum has been met, otherwise the value will be displayed in RED.

Item Detail Information Area Overview
Item Image - Displays an item image if one has been saved for the item in the Inventory File or else it is blank.
Item Details
•On Order Quantity - The total number of units that are already ordered from the supplier, but not yet received.
•Reorder Quantity - Quantity to order when On Hand Quantity + On Order < Order Point. Set on the Inventory File Inventory Tab.
•Order Point - Minimum stock level set on the Inventory File Vendor Tab.
•Last Cost - The last price paid for the item.
•Last Purchase - The date of the last purchase of the item from the vendor.
Pallet Information This information is entered for the item using the Pallet Info button on the Vendor Tab in the Inventory File.
•Cases per Pallet •Cases per Layer •Layers per Pallet |
|

Auto PO Parameters Minimum Order Type - Taken from the Vendor Tab PO Options sub-tab. Available minimum order type options are: None, Weight, Dollars, Cases, and Pallets.
Minimum Order Amount - Taken from the Vendor Tab PO Options sub-tab.
A numeric value will only be displayed if the Minimum Order Type is not set to “None”. The amount will be specified in whole numbers from 0 to 9,999,999.
Lead Time - Amount of time the vendor requires between placement of the order and delivery.
Usage per Week
Supply Time (weeks)
Past Sales Here 12 weeks of past sales for the selected item are provided.
With columns showing the # cases/weight sold.
|
|


Special Reorder Definitions
You must check System Option # 115 to use the Special Reorder Definitions feature.
These options are set in the Inventory File Vendor Tab for the item. You can define up to 4 alternate order points and reorder quantities. The special reorder definitions can be useful for increasing or decreasing how often an item is purchased and the quantity to maintain on hand before the item is considered to be in a low inventory state.
Order Point - The order point represents the minimum stock level.
Reorder Quantity - The quantity to order for use in batch entry edit mode in create purchase orders.
Estimated Totals Area

If the vendor minimum order parameters have been defined in the PO Options area of the Vendor Tab for cases, pallets, weight or cost that field value will be displayed with a GREEN highlight if the minimum required has been met, otherwise the value will be displayed with RED highlights.
In this example the PO Options Minimum Order is set to 15 cases. So the number of cases required by the vendor has been met and the cases field is highlighted in green. Here we used the Only Display Required Items option to see just the items we needed to order.